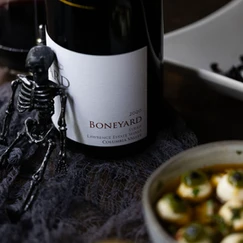
Three “Treats” and One “Trick” to Pair With Our Favorite Hallo-Wine
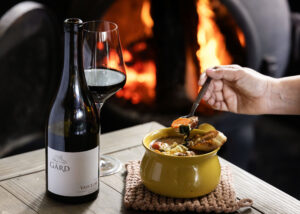
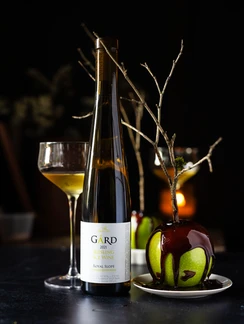
Our 2020 Boneyard Syrah is to die for! It pairs well with each of these spellbinding snacks, while keeping the “spirited” vibe going. Treat yourself this Halloween!

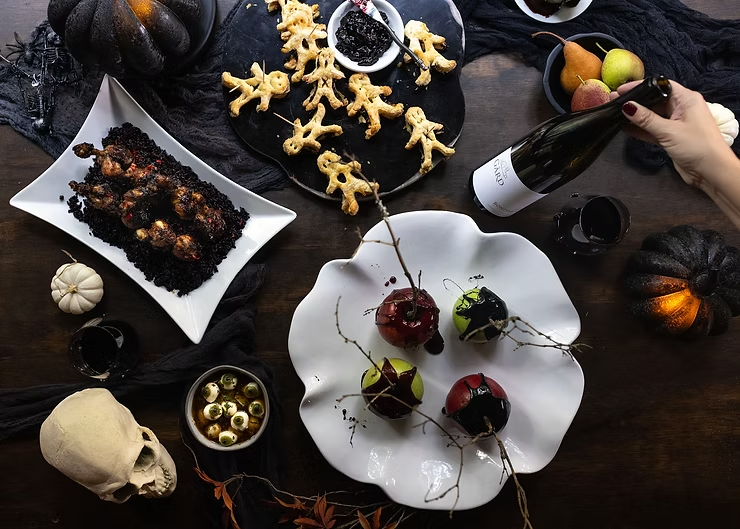
Our latest recipe & pairing blog post was our most challenging and most rewarding yet. We prepared four Halloween-inspired dishes to share with you while sometimes adding our own bewitching spin, as well as tips and hints on how to make them shockingly special. And we had so much fun doing it! From eye balls to voodoo dolls, we absolutely LOVE Halloween season.

If you do too, this post is for you. Cheers to aaaaaall the spooky wine and snacks! Let’s get to it…
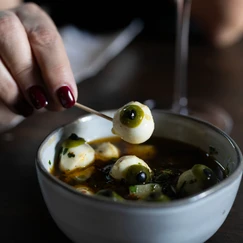
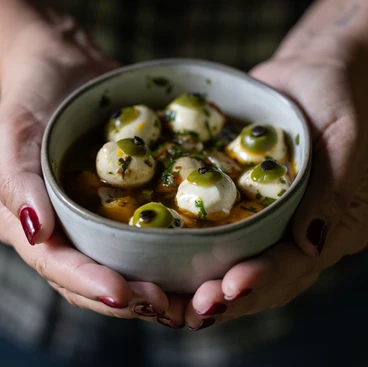
1. Erie Eyeballs

Whip up these creepy, spooky and scary-delicious marinated mozzarella eyeballs as a perfect appetizer for a Halloween party…boo! We made these eyes exactly as the recipe states and had so much fun grossing each other out during this shoot. Get the recipe by Julia Levy.
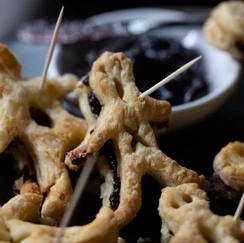
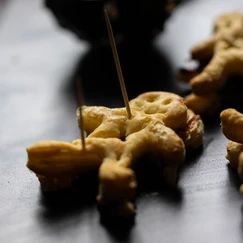
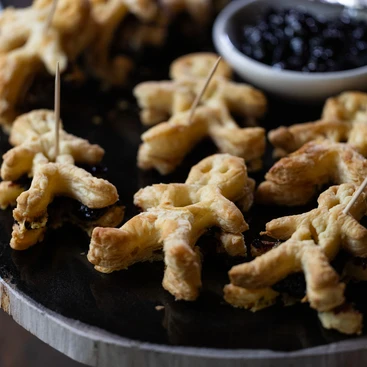
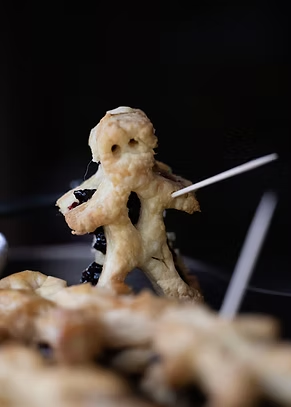
2. Totally Tragic Voodoo Dolls

While typical voodoo dolls are made in likeness to their subject in order to curse said subject, our little dolls were made with love and a fondness for spooky Halloween fun. No spells required and no persons were harmed in the making of this recipe – LOL.
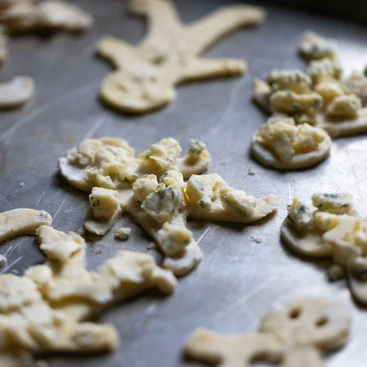
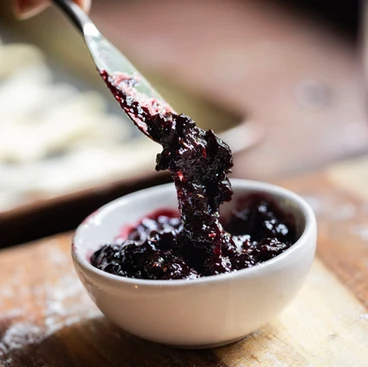
Inspired by Puff Pastry Voodoo Dolls by Tina Dawson, who made hers with an interesting beet filling, ours are filled with salty, funky Blue Stilton cheese and a version of our own Spiced-Wine Cranberry Sauce. Yum!
Scroll down for deets…

Totally Tragic Voodoo Dolls
By Tanya Miller, inspired by Tina Dawson
INGREDIENTS:
- Frozen puff pastry, thawed but very chilled (it’ll be much easier to work with if cold)
- Spiced Wine Cranberry Sauce (follow this recipe; if you can’t find cranberries in stores yet, we recommend substituting frozen red cherries and reducing sugar to ½-¾ cup) or a using a prepared dark red jam of your choice, such as Raspberry Bonne Maman
- Blue Stilton cheese – or if you aren’t down with the funk, try Parmesan, or Pecorino
ALSO NEEDED:
- Toothpick “pins”
INSTRUCTIONS:
- Follow instructions for creating the dolls from Tina’s recipe, but do not add the sauce or jam filling until after baking. She even has a template you can print and use to cut out your dolls – super helpful!
- Before baking, sprinkle the cheese on the uncut (bottom) half of the pastry dolls. Cook tops and bottoms according to directions until golden brown.
- Once out of the oven, add a layer of sauce or jam to the bottom of the top side of the pastry dolls and assemble into a little voodoo doll sandwich – jam against cheese. Stab in your toothpick “pins”, serve while still warm if possible, and enjoy with a glass of Boneyard Syrah!
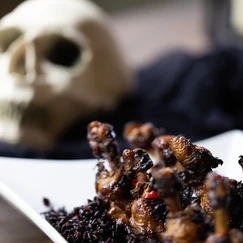
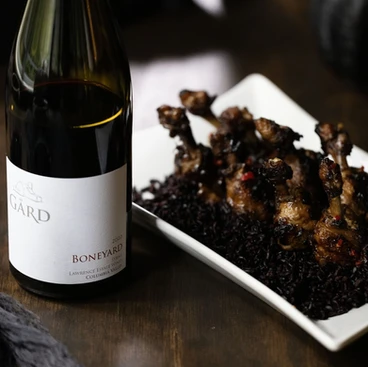
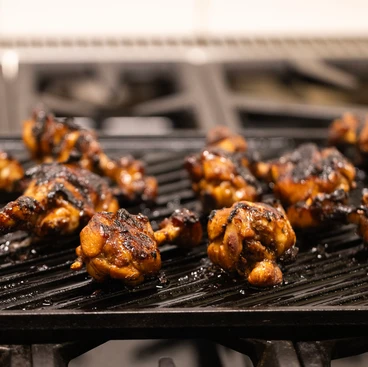
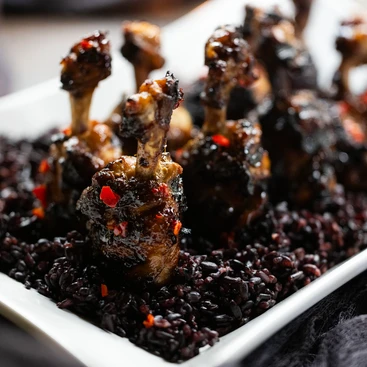
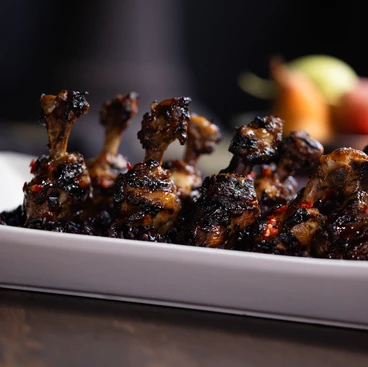
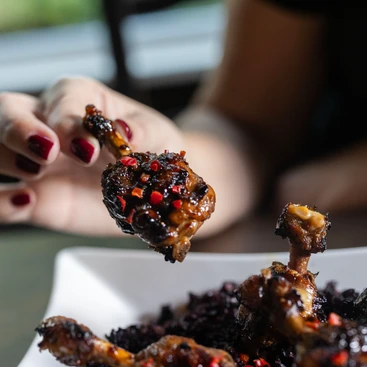
3. Bony Bites

Wow your friends with these wickedly tasty, spicy-sweet, Asian-inspired, crispy chicken exposed-bone drumette “lollipops” on a bed of forbidden rice!
We followed Martha Stewart’s Bony Bites recipe, but found the outcome to be rather bland, and not crispy enough. Buuuuut, we loved the idea so much, we made it again with some adjustments. We ramped up the flavor, the crisp factor, and added a bed of black rice to nestle the drumettes into so they stand up instead of tipping over, showing off the bones we worked so hard for.
We recommend following the recipe with a few helpful tips:
- Marinate the chicken the day before if possible, and let them dry out uncovered in the fridge overnight or as long as you can. This helps with the browning of the chicken.
- For increased flavor, we made the following changes to the marinade before marinating:
- Added ½+ tsp Montreal Steak Seasoning
- Added 2 Tbsp brown sugar
- Used Chili Garlic Sauce instead of Sriracha
- For the basting sauce: The recipe calls for reducing down the leftover marinade and thickening it to use to baste the drumettes multiple times during the cooking process. In the last 5 minutes of reducing the reserved marinade, we added chopped garlic and 1 Tbsp Sweet Chili Sauce (so they wouldn’t burn).
- To simplify basting and get chicken crispy, we reduced the leftover basting marinade down a bit more than was called for and only basted once.
The results were spooky, sticky, crispy, juicy, delicious bony bites!
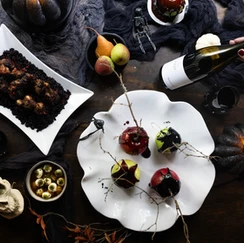
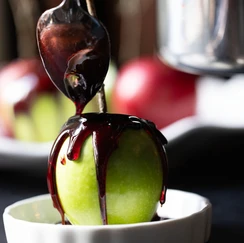
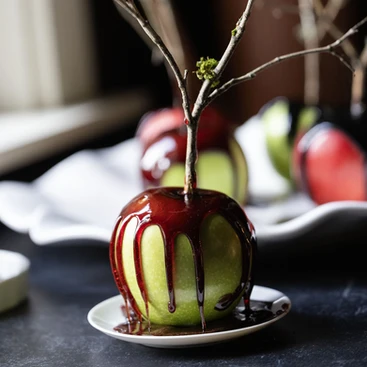
4. “Poison” Apples
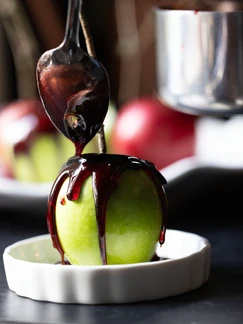
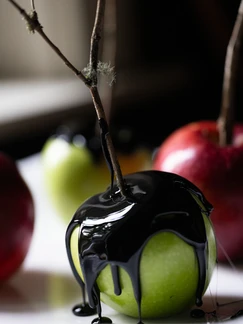
OK, so this is our one “trick”. These glossy candied apples are spook-tacularly stunning! However, we recommend them as more of a decoration because in all honesty they taste kind of meh. But they are so cool!!! They are totally edible, but you just can’t beat the salty richness of a caramel apple. We’d use these as table or bar decor or add three as toppers for a caramel apple spice cake!
Black Lacquered Candied Apples

By Tanya Miller
Makes: 3-4 candy apples
Pairs well with: Riesling Ice Wine or Boneyard
INGREDIENTS:
- 3-4 Granny Smith or red apples – preferably unwaxed/organic as the coating will adhere better
- Twigs for handles – If eating them, use nontoxic twigs. We trimmed some from our yard
- 1 ½ c sugar
- ½ c water
- ¼ c light corn syrup
- A few drops black gel food coloring or 1½ tsp food grade activated charcoal, depending on how black you want the syrup to be (we used charcoal)
ALSO NEEDED:
- Candy thermometer
INSTRUCTIONS:
- Cut branches to desired length.
- Wash, dry and remove stems from apples. Using a large skewer (we used bamboo), poke a hole for the twig to go into, about ½-⅔ into the apple. Remove skewer and insert each branch. Place apples on a parchment paper lined baking sheet if you want to easily remove them, or place them directly on desired dish for decoration. We went with the latter so as to “pool” the “blood” on the plate.
- Attach a candy thermometer to a small-medium heavy based saucepan. Over medium heat, add sugar, water and corn syrup. Stir until sugar dissolves. Then turn heat up to med-high and boil until hard crack stage – 300 degrees.
- Remove from heat and quickly stir in charcoal or gel food coloring. Once it has stopped bubbling, carefully (it’s boiling hot y’all) drizzle over apples with a spoon or from the pan. Try to work quickly before it hardens. If the candy syrup gets too hard, gently reheat it until desired consistency is reached and try again. Let candied apples cool.
Blood-Red Wine Candied Apples

By Tanya Miller
Makes: 3-4 candy apples
Pairs well with: Riesling Ice Wine or Boneyard
INGREDIENTS:
- Granny Smith apples – preferably unwaxed/organic as the coating will adhere better (would not recommend a red apple for this one because the red wine candy won’t show up as well on the red apple)
- ¾ c sugar
- ¾ c light red wine – such as a Pinot Noir, Carménère, or Grenache (you could try something darker, but we wanted ours to be blood red)
INSTRUCTIONS:
- Follow cooking instructions for the Black Lacquered Candied Apples above with the exception of the candy temperature. Cook to a temp of 240-260 degrees, for more of a sticky, caramel-like wine sauce.
In conclusion…
If you made it to the end, thank you for reading! We hope you enjoyed it and that we’ve inspired you to try one or two of these fun Halloween recipes – and treat yourself to a bottle of Boneyard while you’re at it. It not only pairs with the dishes we’ve mentioned here, but will also complement full-flavored harvest dishes, such as cinnamon pumpkin soup, zucchini sausage lasagna or chanterelle mushroom beef stew. It’s hauntingly delicious!
And if you do try the recipes (or any others you pair with Gård wines), we’d love to hear from you. You can email me with photos and /or comments, or tag us on social media @gardvintners. Skål!